
-=- The art of Weathering -=-

Theres not really any particular `Art' to it, I think there are only two `rules' when weathering wagons, or indeed any models, and even these are not by any means fixed rules, merely guidelines that can help you to produce more realistic models.
Rule 1: Work from Photographs! Try to work from a photo of the exact vehicle you are trying to make, If you cannot find a photograph or image of the exact vehicle, look for something in the same group, class or type and use it as a reference to see which bits were worn, rusty or dirty on the real thing. This is much better than trying to guess, When modelling historical prototypes a Black & White image is better than none and can often show finer detail than early colour photographs.
Rule 2: Apply weathering in THIN coats! Real wagons are mainly one colour when new, but that doesn't last for long, especially when modelling from the days of steam. All railway vehicles, especially goods stock, rapidly accumulated dirt from the harsh environments in which they worked, the various `layers' of grime being washed into corners & seams between boards by the rain, which also `cleaned' some of the muck off the roofs & wagon bodies giving them differing `shades' and `hues' of the original colour. There is also general wear & tear to think about, things like worn edges on foot steps & below doors.
-=- Damage & Repairs. -=-
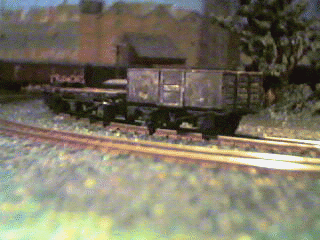
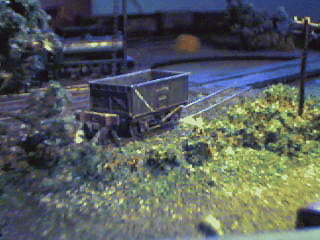
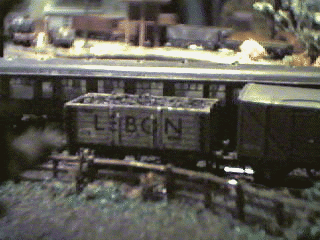
If you are modelling an old wagon that may have done thousands of miles in service, chances are it would have been repaired a few times. `Replaced' planking on the sides & ends of vans & plank wagons, and on the floors of open wagons, are easily modelled by simply repainting the individual planks after giving the whole model 3 or 4 coats of light weathering (with varying colours), then after the `repaired' bits have thoroughly dried continue with more coats of differing coloured weathering until the model looks work-stained enough. When modelling steel built wagons, like the 16 Ton mineral wagon shown above, remember to make the dents and prepare the `rusty bits' before painting! Dents are easily made by warming up the plastic in warm water for a few minutes (Do not use boiling water, as you can warp some parts by overheating, the general rule is; if it's too hot for your hands, it's too hot for your plastic.) Then carefully press the plastic `outwards' from inside the wagon with any blunt item.
I use a selection of screwdrivers and `wax carving' tools to produce dents of varying sizes and shapes. I then use the tip of a scalpel blade to `roughen up' areas that are going to be rusty. Once painted the roughened areas give the paint a `lumpy' or 'bubbled' look, then you simply dry brush your chosen `rust coloured paint' onto the rough patches then weather as you would any other wagon. I would advise a bit of practice on some scrap plastic or `styrene sheet' before attacking your models as it is easy to split or shatter some of the plastics used in making model kits. The most important thing is to try to keep the plastic warm so it is more pliable and less likely to break, this is achieved by simply dunking it back into warm water for a few minutes.
-=- What paint ? -=-
Acrylics
I have found that using acrylic paints gives a better Matt finish and is much easier to use for weathering than enamel or oil based paints, Acrylics are water based so can be easily thinned or mixed, they dont smell as bad in use as they are free of toxic chemicals and have the added bonus that they dry quite quickly.
I have been using `All Purpose Acrylic Craft Paint' bought cheaply at a local craft shop for some time now with reasonable results. These are thinned with water and can be brushed or sprayed onto the model. You do not always have to use a coat of primer but the paint will adhere to metals and some plastics a lot better if a primer coat is applied first.
Enamels
I use enamel paints for models that are to be used outdoors and on some underframes and chassis units. You can use Talcum powder to transform glossy enamels into a matt finish by lightly sprinkling talc over the wet enamel paint and lightly brushing off the talc once it has dried. Some of the fine partacles of talc will adhere to the paint producing a rough surface, when used in several coats to produce a roughened finish (EG; for felt roofing) on flat smooth surfaces (plastic, metal) it is best to apply a fine sprinkling of talc to a coat of paint, allow it to dry and lightly brush off any excess talc, apply two or three coats using this method to build up the roughness of the surface to the desired level.
On thing to consider when using talc on enamels is that it will fractionally lighten the hue of the paint, this can be usefull to produce a slightly sun bleached appearance. Enamel paint can take longer to completely dry when talc has been used as the paint is thicker around the talc particles taking longer to fully cure.
The whole model is then `sealed' with a light spray of clear satin varnish, and a final weathering coat can be applied once the varnish sealing coat has fully dried. The paint coat and varnish sealing coat are best left to dry for at least 12 hours.
It may seem like it takes a long time to weather models in this way but when You end up with a model that looks like it has seen a few years of hard work, like its full size prototype, it is well worth the time and effort. After all it takes years to get the real full size vehicles to look like that! :-)
Celulose "Car Paint"
There are a great many colours and shades of celulose based spray paints available in hobby, model and car accessory shops that can be used for models. If You are going to use a celulose based spray it pays to test it on a scrap of plastic, a bit of sprue from a the kit or on a non critical area that will not be seen when the model is complete as the paint and propellants do react with some plastics used to produce models.
Over the years I have seen nice paint jobs wrecked due to the paint or varnish causing an unwanted reaction with the plastic or a previous coat of paint which produced a "crazed" finish requiring a complete strip and repaint. I have also seen a few models ruined when celulose spray paints have caused a chemical reaction melting fine details on the surface of the model.
Undercoats & Varnishes
Whatever type of paint You decide to use make sure the undercoat and varnish You intend to use are the right ones. You dont want to have to trip the model after the first coat of paint reacts with an incompatible undercoat and it is heartbraking to see a nicely painted model wrecked by unwanted reactions between incompatible paint and the finishing varnish coat!.
To avoid any unwanted reactions take care to select the correct undercoat, paint and varnish, if You are unsure ask at the shop before You buy it. To be absolutely sure, try them out on something that doesn't matter before using them on your model.
Lexan
Lexan paint is a bit special, it dries flexible! It is designed for use on lexan plastic bodyshells used on radio controlled model vehicles. Although most RC racing is supposed to be non contact, an accidental contact (or "NERF" as it is known in RC racing circles) happens quite often. The bodyshells are vacuum molded from clear lexan plastic and are intended to flex when the models make contact with each other. Although railway models don't tend to use lexan plastic there are uses for this specialised paint in railway modelling. Lexan paint sticks to glazing very well and can be used on flexible items without cracking off, it also stands up to scratches and rough treatment much better than other types of paint. A thin layer of Lexan paint can be used to good effect for colouring the glazed spectacles on working semaphore signals. I'm sure there are many more uses for Lexan paint in railway modelling, like flexible gangway vestibule connections and inter-coach jumpers and interconnecting wires disguised as steam pipes etc.


Copyright Notes